Sunday 7 August 2016

How to play Pokemon GO without moving in Android (No Root)(Marshmellows 6.0+)

Pokemon GO without moving Joystick (No Root)(Marshmellows 6.0+)

How to setup Pokemon GO GPS hack in Android (No Root)

Step 1. Download and install both the required Apps mentioned above.
Step 2. Go to Settings App > About Phone > Tap on build number 7 times to activate Developer options in your device.
Step 3. Go back to Settings > Developer options. Locate “Select mock location app” & select Fly GPS (com.fly.gps)

Select Mock location App – Pokemon GO Hack

Step 4. Again go to Settings > Location & set GPS mode to High accuracy (Use GPS, WiFi, Bluetooth or mobile data)

Step 5. Now launch Fly GPS app & locate any location you want to go. Click on the desired location & hit “Please select the menu”.

Step 6. Tap on “GPS Service Run” which will open up another menu. Tap on “Joystick location mode [Pokemon]”.

Step 7. That’s it! Now launch Pokemon GO Game & you’ll see a Joystick to move around.

Pokemon Go Apk link here
Fly Gps App Link 

Sunday 24 July 2016

(Trick)Pokemon Go without moving


Pokemon Go is an Augmented reality mobile game which is played on a location based GPS game where you need to move and catch the Pokemon. The game was released in July 2016. It is a game which allows a player who can capture the Pokemon, battle and train them in the reality which appears on the device screens just like it is in the real world. It makes use of GPS and the camera of compatible devices. Today with GPS, to find a Pokemon, we need to walk in the real world. So we introduce Pokemon Go Joystick developed by XDA senior member 


Today we have a Joystick developed by XDA Senior Member  balamu96m which you can use on the Pokemon Go so that you can walk around the Pokemon Go application without the use of GPS. you can simply move the joystick on the screen to move. This is a Xposed module, So your phone must be rooted and installed Xposed Framework. By using the Pokemon Go Joystick modules, you can turn your Pokemon Go experience safer by Using the joystick provided to navigate in any direction. The joystick appears as an overlay. Go in any direction.


This app is still in Beta stage, So the developer of this module balamu96m has fixed some of the issue related to it in the recent update on Pokemon Go Joystick – v1.3 version. So now you can download the Pokemon Go Joystick and Enjoy!


This module allows you to play Pokemon Go without moving out! Use the joystick provided to navigate in any direction.

The joystick appears as a overlay. Go in any direction.

No other module is needed to hide location mocking!

Download:

Download from Xposed repo: http://repo.xposed.info/module/com.b...emongojoystick

Or From attachments

Features:
  1. Choose starting location in map
  2. Search for a location in map
  3. Store favourite locations as bookmarks and load them quickly!
  4. Continue from where you left
  5. Walk continuously in a direction
  6. Right/Left handed mode
  7. Swap E/W direction in joystick
  8. Use the persistent notification use toggle joystick on/off on the fly!
  9. Choose movement speed on the fly!


How to use bookmarks:
  1. Open map
  2. Tap your favourite location
  3. Give it a name
  4. Done!


To load:
  1. Open bookmarks
  2. Choose your saved location
  3. Done!
  4. Press back and start joystick

To delete:
  1. Long press that bookmark -> Delete.

Steps:
  • Install the module
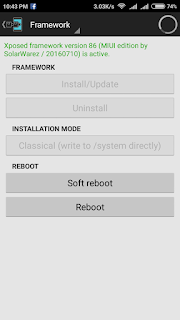
  • Enable in Xposed
  • In Settings -> Developer options -> Enable mock location (Android <6.0) and 'Select mock location app' for (6.0+)
  • Reboot
  • Open Joystick
  • Navigate like a boss!


How to Get safe:

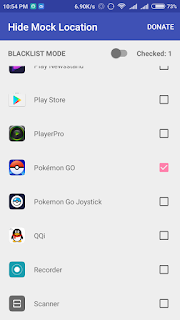
  • Enable Hide Mock location link Xposed in exposed modules.
  • Reboot after enabling it
  • then add Pokemon Go to Blacklist app 


Use Device Only Location settings


If you get this message in Marshmallow: "Enable:Settings -> Developer options -> Allow mock locations", Try this:
Open this app and then open Settings -> Developer Options -> Choose mock location app -> Choose 'Pokemon Go Joystick'


Best practices:
  • When moving form v1.x to 2.x, Clear data before launching the updated app. Make sure you 'Allow mock locations' or Select this app in 'Select mock location app' (Marshmallow)before launching the module
  • Set location mode to 'Device only' in case you are troubled when fighting/capturing.
  • Set speed to slow/slower if you want to search for Pokemons. Running faster may not give adequate time for a Pokemon to spawn in that location.
  • Don't start at far off locations. You might get banned.

Thursday 21 July 2016

Steps For Flashing Through Mi Recovery

Steps For Flashing Through Mi Recovery (Works with updates also for every MI phones)


Download the latest MIUI ROM file From Above Links.Rename the downloaded ROM file to ‘update.zip’ on the computer. 


Connect your device to the Windows PC/laptop via a micro USB cable, and copy the ROM file downloaded and renamed in Step 1 into the root directory of the internal storage of your device. (Do not put it in any folder) 


Enter the Recovery mode of your device. There are 2 methods to do it as follows:
Method 1: Launch ‘Updater’ app on your device, click the ‘…’ icon at the top-right corner, and select ‘Reboot to Recovery mode’ to enter.
Method 2: You can also turn off your device and then hold both Volume+ button and Power button at the same time to enter Recovery mode.


After entering Recovery mode, choose the language you use, select ‘Install update.zip to System One’ and confirm, and then your device will begin updating automatically. Wait until the update is completed, choose ‘Reboot to System One’, and then your device should boot to the new version.


In Recovery mode, you can use Volume +/- to select up/down, and Power button to confirm.


Steps For Flashing Through Custom Recovery :-

Boot into Recovery.
Factory reset
Flash the Rom file from SD Card.
Reboot ! ,The Rom Would Be Successfully Flashed on Your Device.

Please Note: It is Recommended to Flash through MI Recovery as it is easiest and NOOB Friendly,if you are well versed with Custom Recovery,you can use the Custom Recovery Method too.

Wednesday 20 July 2016

[MIUI Device Team] MIUI Rom Flashing Guide for Redmi 2/2A/Prime[Fastboot Method]

[MIUI Device Team] MIUI Rom Flashing Guide for Redmi 2/2A/Prime[Fastboot Method]


Hello Good MIUIers,

This Guide is for flashing any MIUI Rom (Global/China Developer/Global Beta Build/Stable ROM) on Redmi 2 using MI Flash and Fastboot ROM(Fastboot Method).


Steps:-

1. Download ROM from the above link (Which One you Want to Flash) and extract it to Desktop.
Note: - Some users get error while extracting onDesktop Because there is space in the username of PC or the folder as shown.
The users should put the ROM In C Drive in a folder without spaces. E,g C:/ROM/MIUI
The Error shown when using space between foldername


2. Download flashing tool from the above link and install it.
3. Once installation is complete, Run MiFlash application


4. Click on browse


5. Select ROM folder from Desktop(From the location where ROM is saved)

Note: -The path of the ROM folder Should be like "C:\Users\Aakash612\Desktop\MIUI" Not"C:\Users\Aakash612\Desktop\MIUI\images"

The MIUI Rom folder should Contain the following files

6. Turn off the phone, press and hold the Volume Down key and the Power button at the same time to enter Fastboot mode, then connect the phone to a computer.

7. Press Refresh button to see you device in flashing tool.
After pressing refresh button you will see connected device.
Here You have 3 options to select.
Choose the options carefully as per your need:-
1. Flash_all:- Clears all the data of the built-in storage, clear all user data, please be careful!(Clean Install)
2. Flash_all_except_storaget:- Will erase all user data does not clear the built-in storage data.
3. Flash_all_except_data_storage:- Does not clear the built-in storage data does not clear user data
Note:- It is advised to take all personal data backup on PC/Laptop

8. Click on Flash and it will start process

9. Once flashing process completes

Device will automatically reboot. Reboot might take upto 5 minutes.


Thus Flashing the MIUI Rom is done easily. 


Download Links:MI flash Tools


Redmi 2(1GB): Fastboot (MIUI V 7.5.2.0)


Redmi 2 Prime(2GB):Fastboot (MIUI V 7.5.2.0):(Coming soon)

U can flash redmi 2 rom as new update is going to release soon .

FAQs 

What's the difference between Recovery ROM and Fastboot ROM?


A:
 1) To flash Recovery ROM, you just need to put the ROM file into your device's SD card root directory, and flash it in Recovery mode. Flashing Recovery ROM will not wipe your user data or the files in internal storage.
A: 2) To flash Fastboot ROM, you'll need to connect your device to a computer, and use ROM flashing tools. You can choose different fastboot script to decide whether to wipe data or not

(Redmi 2)MIUI 8 Global Beta ROM 6.8.4 (ANDROID 4.4.4 Kitkat)

 MIUI 8 Global Beta ROM 6.8.4 Released

    MIUI 8 Global Developer ROM 6.8.4 for Redmi 2 Features and Changelog
New Features

  • Introducing new design
  • Introducing Second space
  • Dual app support for most apps
  • Scrolling screenshots
  • New Calculator
  • New Scanner
  • Introducing Quick ball
  • Introducing Mi Lanting system font
  • Support for speech-to-text output in Recorder
  • New templates for Notes
  • Redesigned Task Manager
  • Redesigned Gallery
  • Smart menu for editing text
  • Wallpaper Carousel
  • All-new Battery saver
  • Recognition for fraudulent messages

Some MIUI 8 photos for you!


MIUI 8 Global Developer ROM 6.8.4 for Redmi 2 Download Links
   
Recovery Rom 740MB
Fastboot Rom 1036MB

Tuesday 19 July 2016

YU YUNIQUE(YU4711)STOCK ROM FLASHING TECHNIQUE {TESTED AND WORKING}

YU YUNIQUE(YU4711)STOCK ROM FLASHING
TECHNIQUE 
{TESTED AND WORKING}

·Now Extract the folder on Desktop
·        Install the Driver given in the Driver Folder
·        Restart PC
·        Open the ETS Flash tool
·        Connect your phone in USB Debugging Mode
·        Press the Butterfly USB Button
·        You can see your device to the connected USB Slot with Device ID 0X2A96
·        Now open Set Select Emergency Mode and Select the Firmware Folder
·        Now Select the Correct USB Slot for Example : USB801 and Set others to NULL
·        Now Switch off Phone
·        PRESS VOLUME UP + VOLUME DOWN  KEEP PRESSED AND CONNECT USB TO PC

·        You can See like This 

·        Phone will restart Automatically 

ROM LINKS 
V 1.09


V 2.09